Help Desk
This section covers interactions between the human agent and the customer (end user) after the customer activates the human handover function on the chatbot. It also addresses supplementary tools for managing customer interactions, including queue management, live chat initiation, archived chat access, contact list maintenance, template message creation, and agent performance review capabilities.
Manage Your Queue
Customers transferred to a human agent by the chatbot are placed in a queue. From here, they get assigned to an agent for a live chat. These assignments can happen automatically or manually. Automatic assigning is configured on the Queue Management interface.
The following image gives you a view of the Queue Management interface.
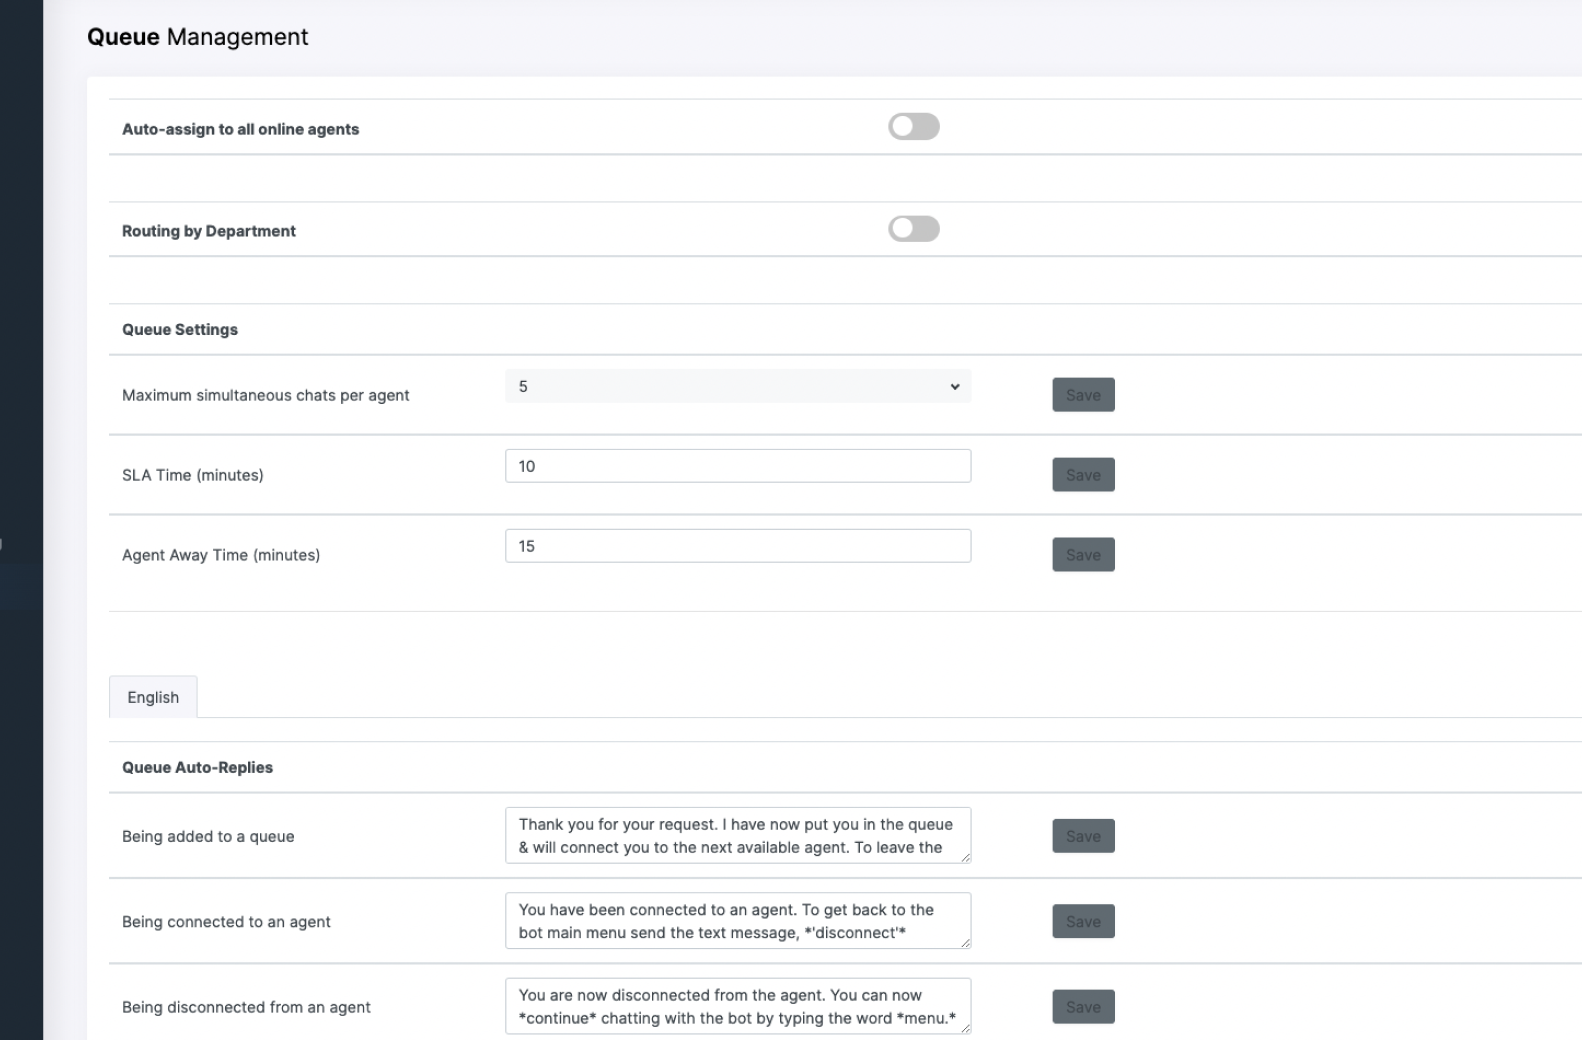
The following description list takes you through the various setting options available on the Queue Management page.
Users need admin permissions to view and configure queue management settings.
Auto-assign to all online agents:
Enabling this setting automatically assigns users in the queue to an agent after a human handoff is triggered by the chatbot.
Routing by Department:
Enabling this setting routes the users in the queue by the department selected during the chatbot's execution of the human handoff.
Maximum simultaneous chats per agent:
This setting allows you to configure the maximum number of users an agent can interact with via Live Chat at the same time.
SLA Time (minutes):
SLA is an acronym which stands for Service Level Agreement. In this context, SLA Time represents an agreed upon number of minutes an agent can let lapse before they must respond to a newly initiated Live Chat assigned to them. Configuring this setting sends periodic reminders to the agent which prompts them for a response.
Agent Away Time (minutes):
This setting configures the maximum amount of time an agent can remain in an Away status on the platform. Configuring this setting sends periodic reminders to the agent which prompt them to return to an Online status.
Queue Auto-Replies:
This setting lets you manage automatic replies sent to users waiting in the queue. These messages provide periodic updates on the status of their handoff to a live agent. The platform includes default replies in all your bot's enabled languages, but you can also review and customize this copy to better suit your needs.
If automatic assigning is not enabled, transferred users must be manually assigned to an agent.
Use the following steps to manually assign a user to your queue.
- On Bua, once you are notified of a user joining the queue, navigate to Help Desk > Queue to view the queue interface illustrated in the following image.
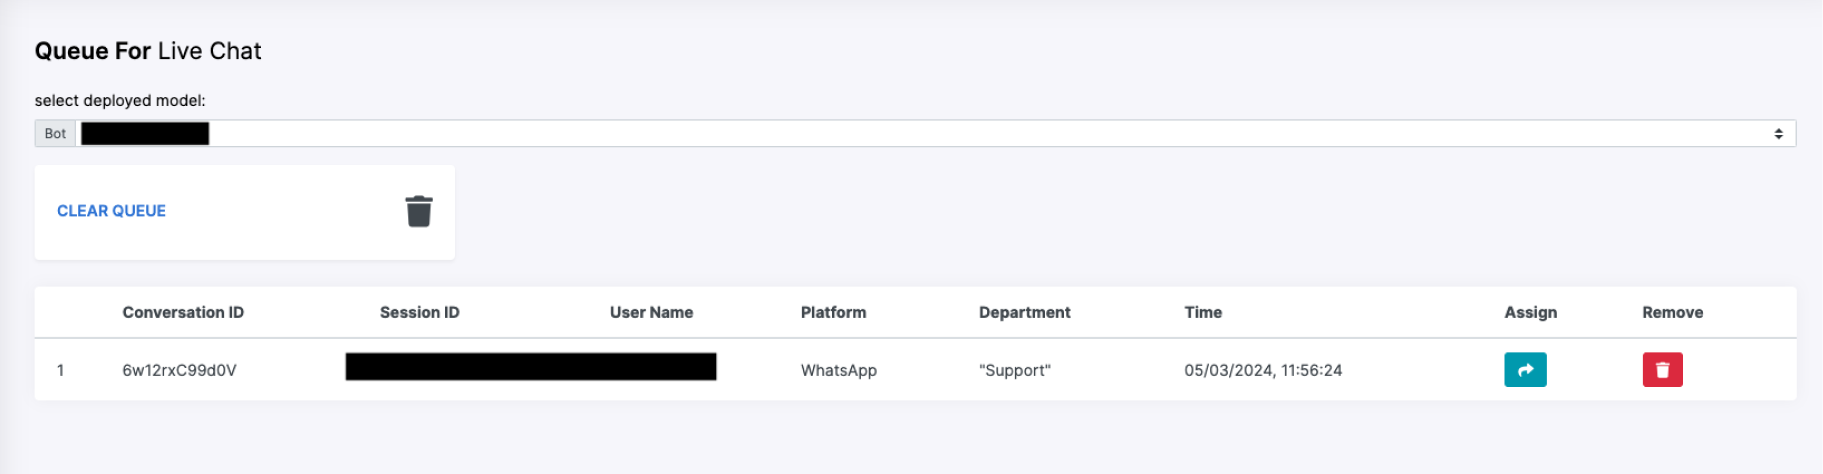
- Click the
Assignicon corresponding to the user you wish to chat with. - The user is assigned to you, and you can begin the conversation in the Live Chats interface discussed in the following section.
Start a Live Chat
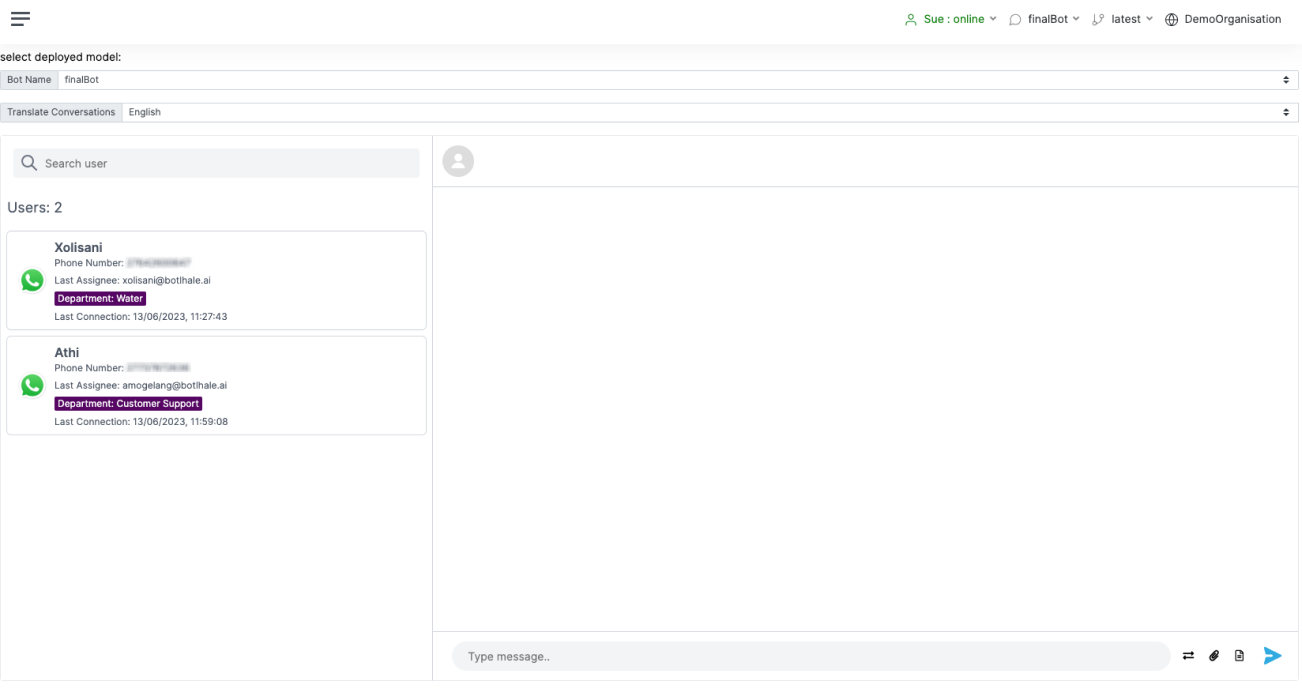
As an agent, once a user has been manually or automatically assigned to you from the queue, you can begin conversing with them via the Live Chat interface illustrated below.
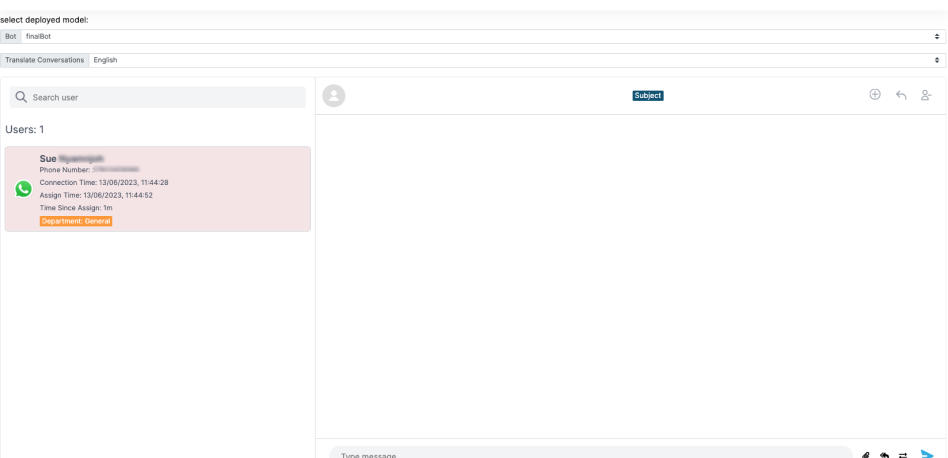
To begin a live chat:
-
On the Live Chat page, click on the user with whom you would like to converse. Their chat history with the bot appears on the conversation pane to the right on the page.
-
Here, you have the option of typing a free-form text message or using the Quick Reply feature.
a. For free-form messages, simply begin typing in the message bar and click the
Sendicon when done.b. For quick replies, click on the
Replyicon next to the message bar. A pop-up window, illustrated in the image that follows, appears, prompting you to select the quick reply you'd like to send.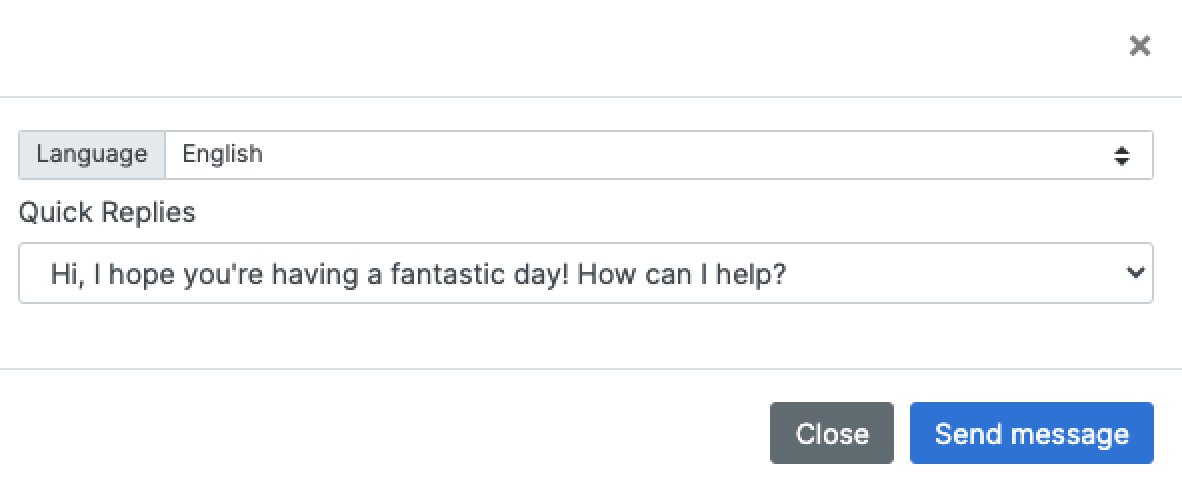
c. Select your desired quick reply and click the
Sendicon when done.
-
Use the arrows next to the Translate Conversations tab to select your preferred language for the live chat. If the user is conversing in a different language, the messages are translated in real-time.
-
Use the icons at the top of the conversation pane to do the following:
- Add a subject line to your conversation
- Transfer the user to another agent
- Mark the conversation as resolved
Manage Archived Chats
On Bua, chats are archived after any of the following events:
- The agent resolves the chat.
- The user disconnects from the chat.
- There has been a 24-hour hour period of inactivity in the chat.
While you can view the conversations from an archived chat, you cannot send messages to a user once their chat has been archived. These archived chats can be accessed by navigating to Help Desk > Archived Chats on Bua.
The following screenshot gives you a view of the Archived Chats interface.
You have the option of restarting an archived chat by sending a preapproved template message. Please note that WhatsApp charges a fee to send Template Messages to archived chats. For more information on template messaging and its associated pricing, see the Messages section of Meta's WhatsApp Business Platform documentation. For information on creating and managing template messages within the Botlhale AI platform, see the Template Messages section of this documentation.
Use the following steps to restart an archived chat.
- From the Archived Chats page, click on the user with whom you would like to converse.
- Their chat history appears in the conversation pane on the right of the page.
- Click on the
Template Messageicon to the right of the message bar. - A pop-up window, illustrated in the image that follows, appears, prompting you to select the template message you wish to send.
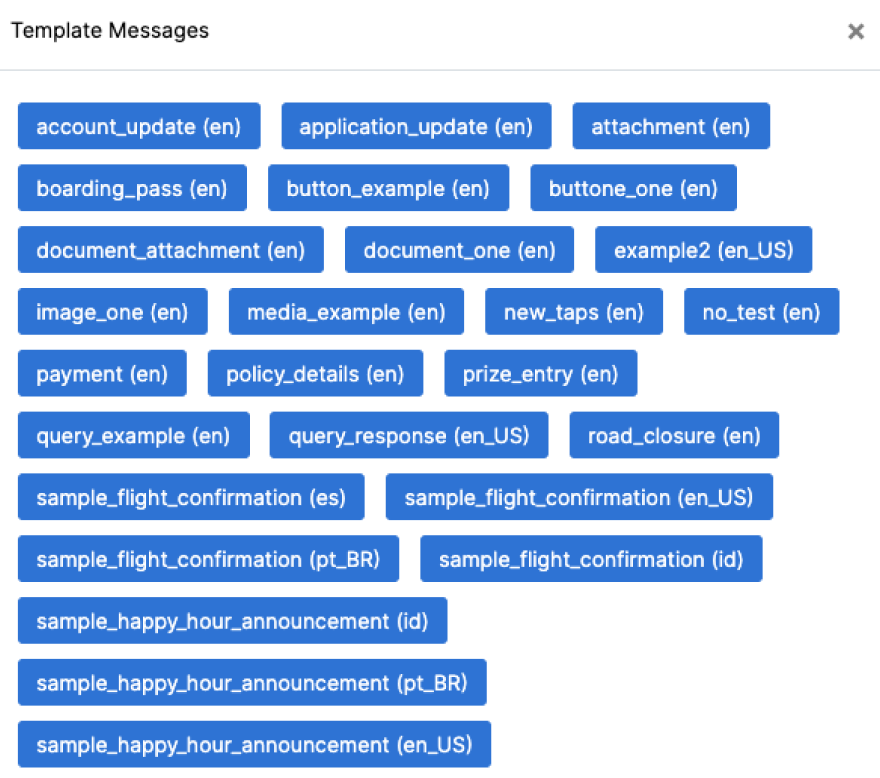
- Select the desired template message and click
Send Template. - Your template message is sent and you can continue conversing with the user.
Manage Contact List
Bua allows you to maintain a database of your chatbot users via the Contact List page. When your chatbot interacts with a user, that end user's name and number are extracted from the conversation and automatically logged in your organisation's contact list. If the end user opts for human handoff, their email is also added to the contact list. This is shown in the following image.
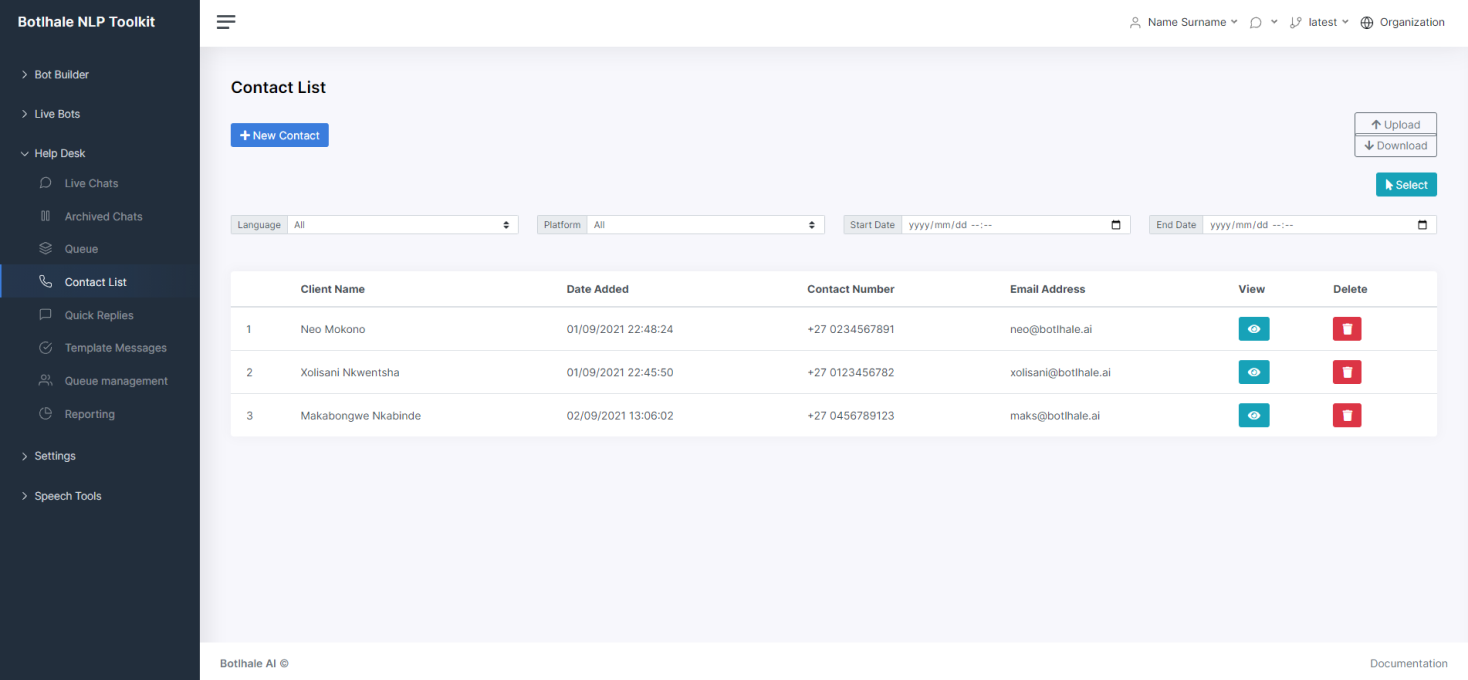
You also have the option of adding contacts to your list manually. There are two ways of executing manual additions to your contact list. You can either add single users, or upload an existing contact list to the platform.
To add a single user:
- From the Bua’s Contact List page, click the
New Contactbutton. - A pop-up window, illustrated in the image that follows, appears, prompting you to enter the details of the contact you wish to add.

- Enter the required information and click
Add Contact. - The information is captured and your new contact is added to your list.
To upload an existing contact list:
- From Bua’s Contact List page, click the
Uploadbutton. - A pop-up window, illustrated in the image that follows, appears, prompting you to choose the file you would like to upload.
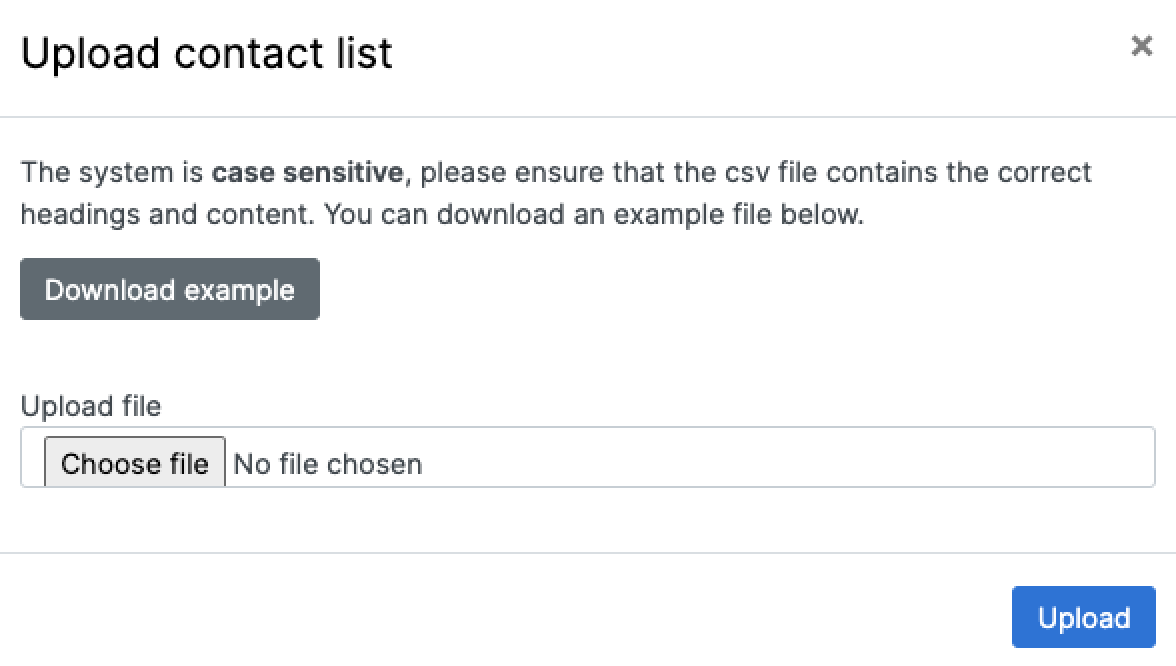
- Once you have chosen your desired file, click the
Uploadbutton. - The data is captured and your new contacts are added to your list.
-
Ensure the contact data in the file you wish to upload is correctly formatted as comma-separated values. If you're unsure about how to do this, download the example file provided in the pop-up window by clicking the Download example button.
-
Use the View icon to see the full details of an existing contact. You also have the option of editing contact details using this icon. Admins can assign tags to users in the contact list.
-
Use the Delete icon to remove an existing contact from your list. Note that this operation is final and cannot be undone.
Set Up Quick Replies
The Quick Reply feature enables you to create a set of pre-written message replies for common inquiries. This streamlines your response process, leading to faster response times and improved user experience.
To create a new Quick Reply:
- Navigate to Bua’s Quick Reply page.
- Click the
CREATE NEW REPLYbutton. - In the pop-up window (see accompanying image), provide a name and the desired message content for your new quick reply.
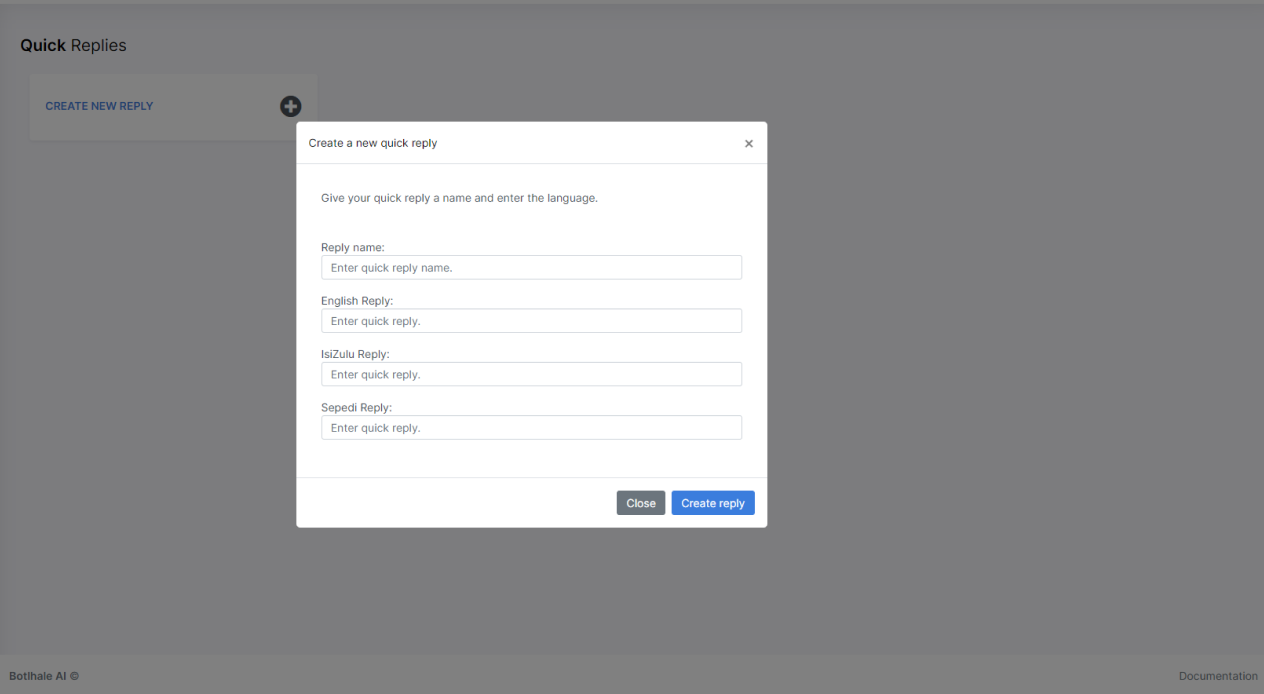
- Click the
Create replybutton. - Your quick reply is created and can now be deployed from the Live Chat interface.
Create Template Messages
Template messages are used to open marketing, utility, and authentication conversations with customers via Meta's WhatsApp Business Platform. This is the only type of message that can be sent to customers who have yet to message you, or who have not sent you a message in the last 24 hours.
Template messages incur fees set by Meta. They must also be approved by Meta before they can be sent to customers. For more information about template message pricing and approvals, see the Meta for Developers documentation.
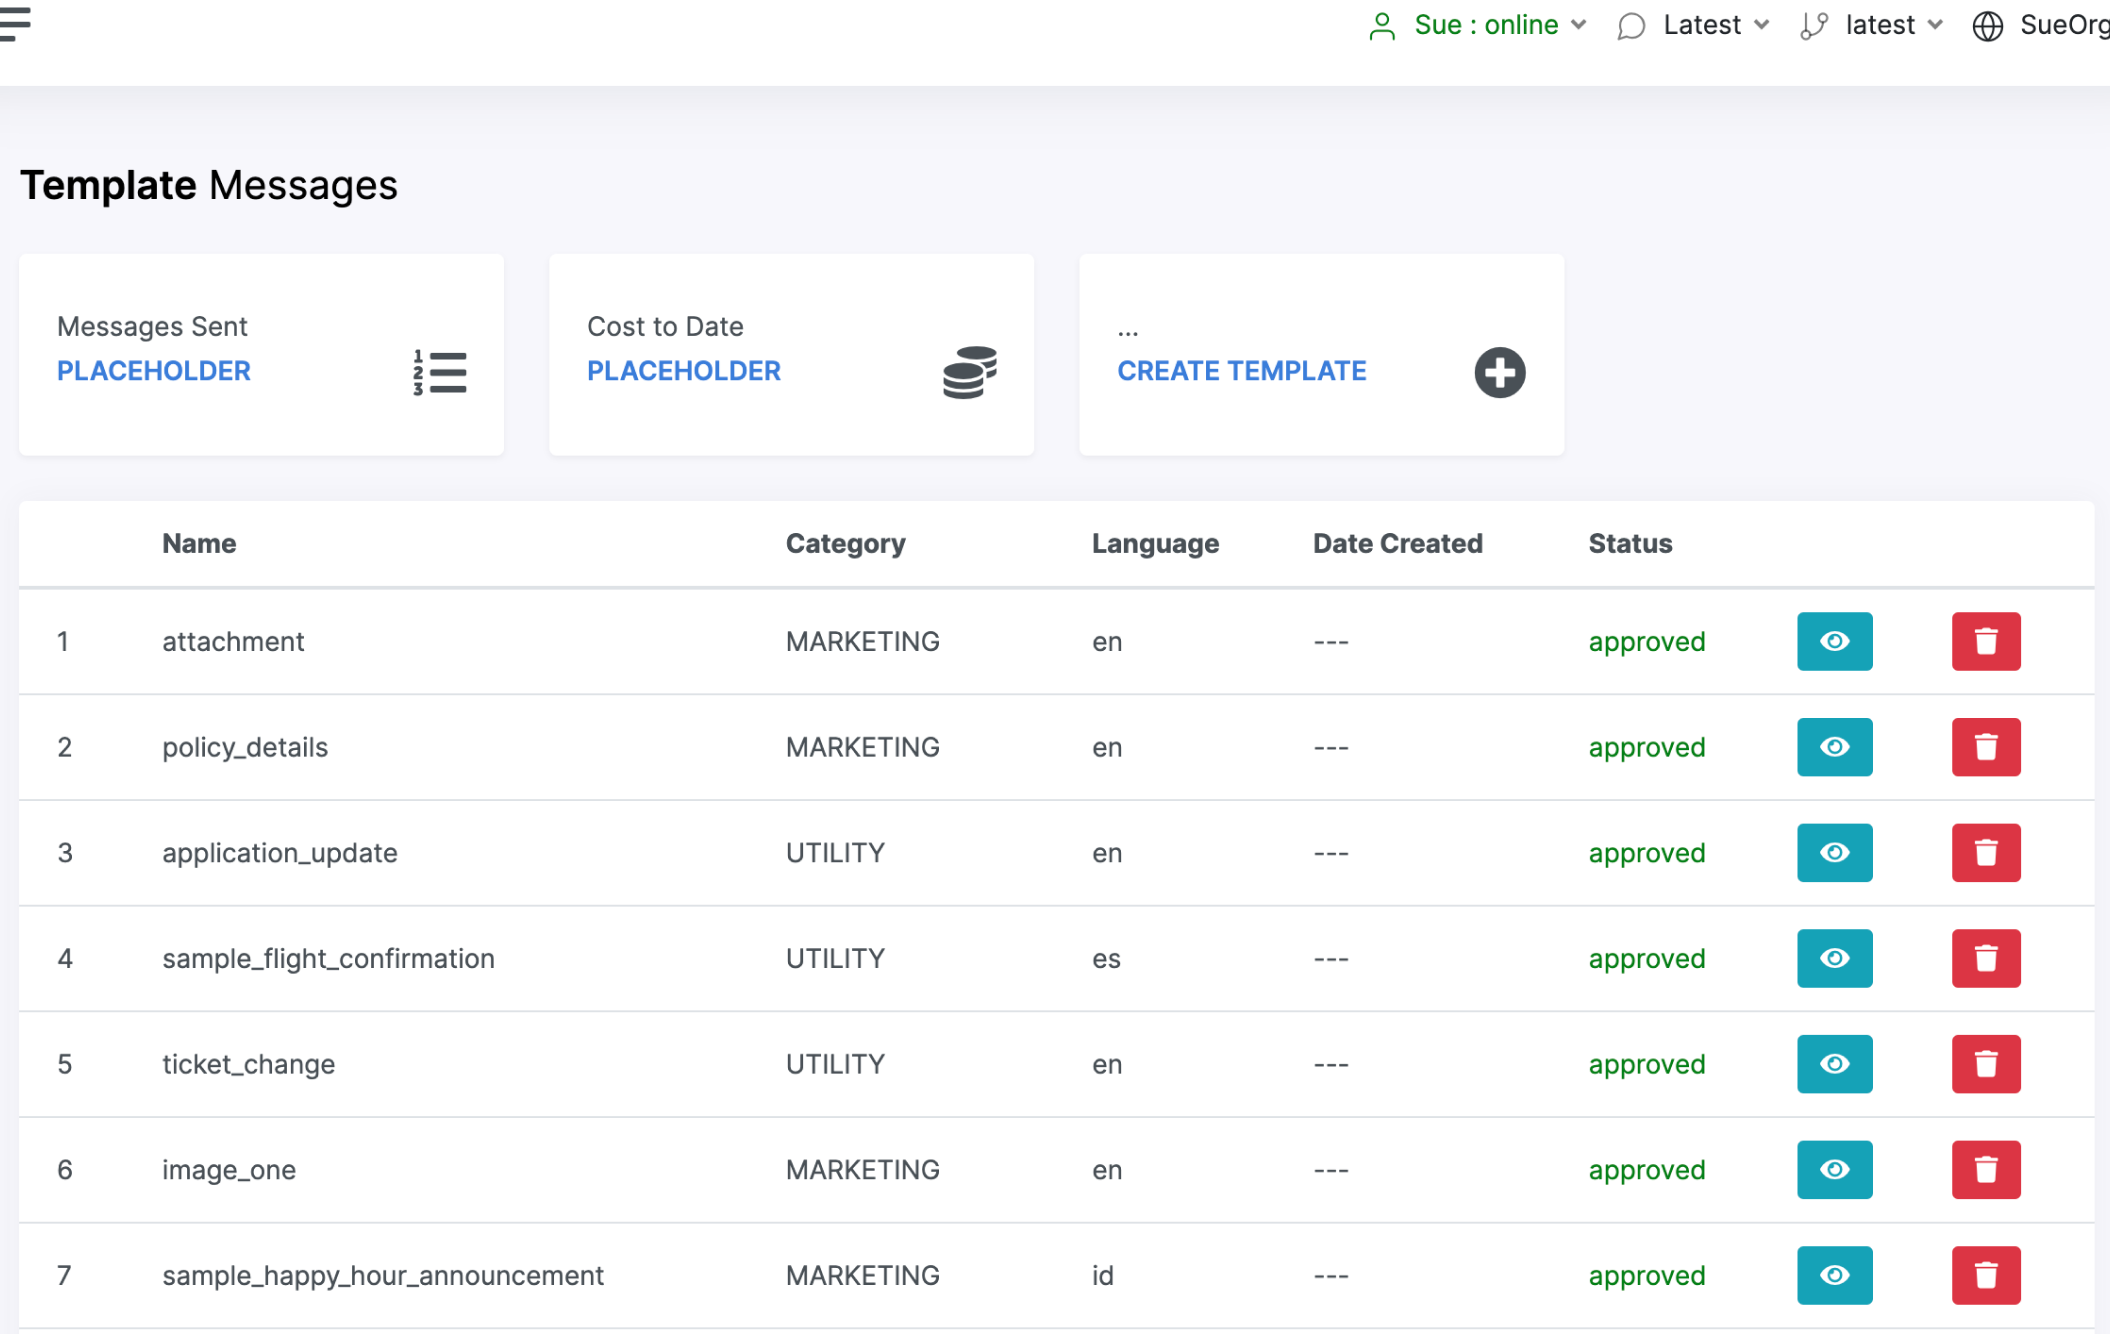
Bua’s Template Message interface allows you to create, view and manage template messages on the Template Messages interface. This is accessible by navigating to Help Desk > Template Messages. The following image gives you a view of the Template Messages interface.
To create a new template message:
- Click on the
Create Templatebutton. - A pop-up window, illustrated in the image that follows, appears, prompting you to enter the information for the new template message.
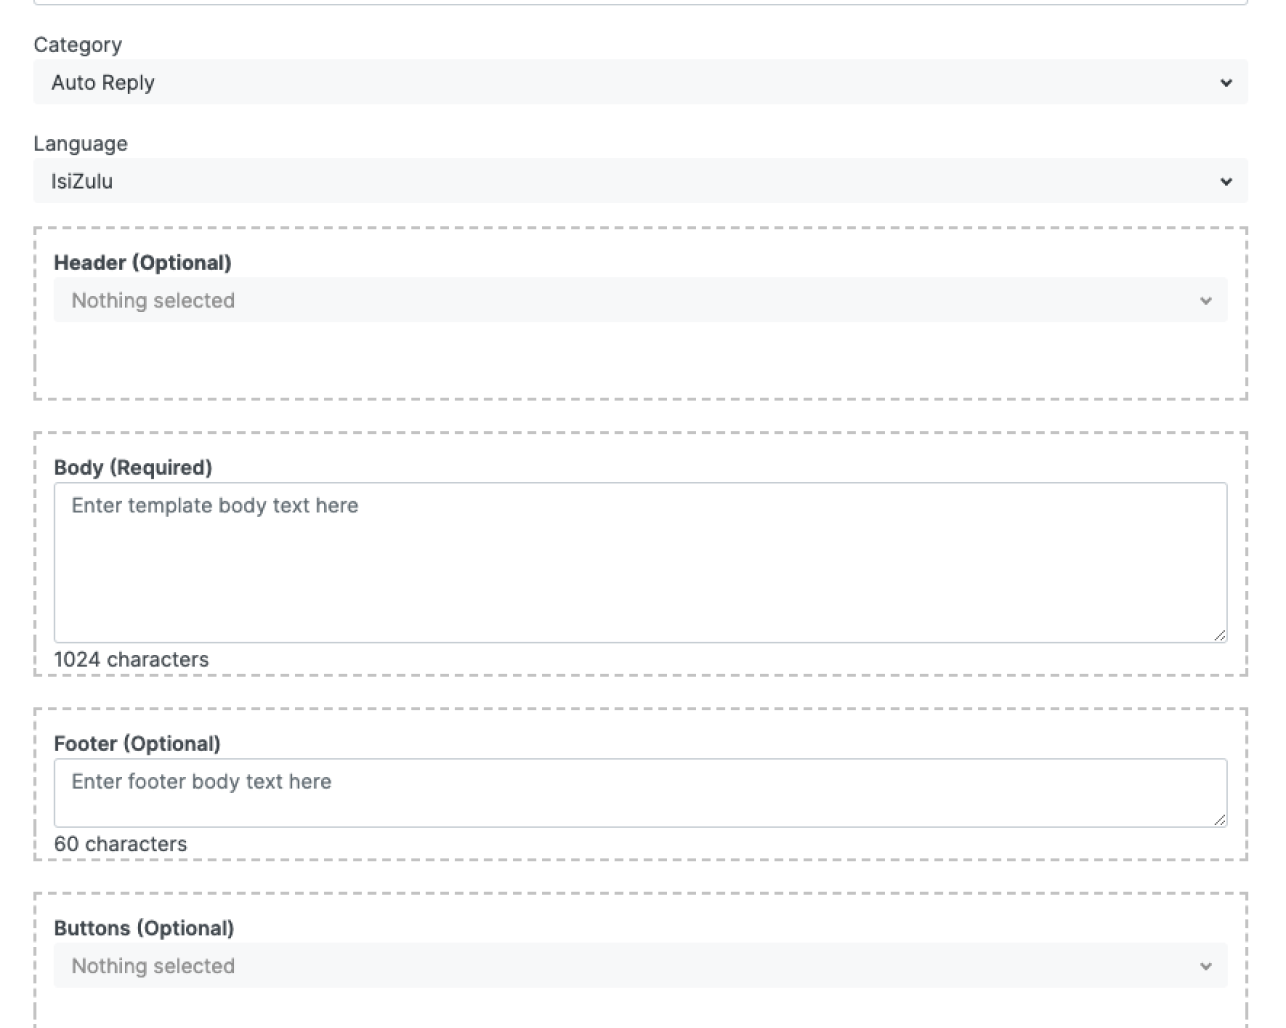
- Enter the requested information and click
Submit Template. - Your template message is created and submitted for approval. You can track the progress of your message approval via the Status bar of the Template Messages interface.
Once your message has been created and approved, you can begin sending it to your customers.
To view the details of an existing template message, simply click the View icon next to the message you wish to see.
To delete an existing template message, simply click the Delete icon next to the message you wish to delete. Note that this action
is final and cannot be rolled back.
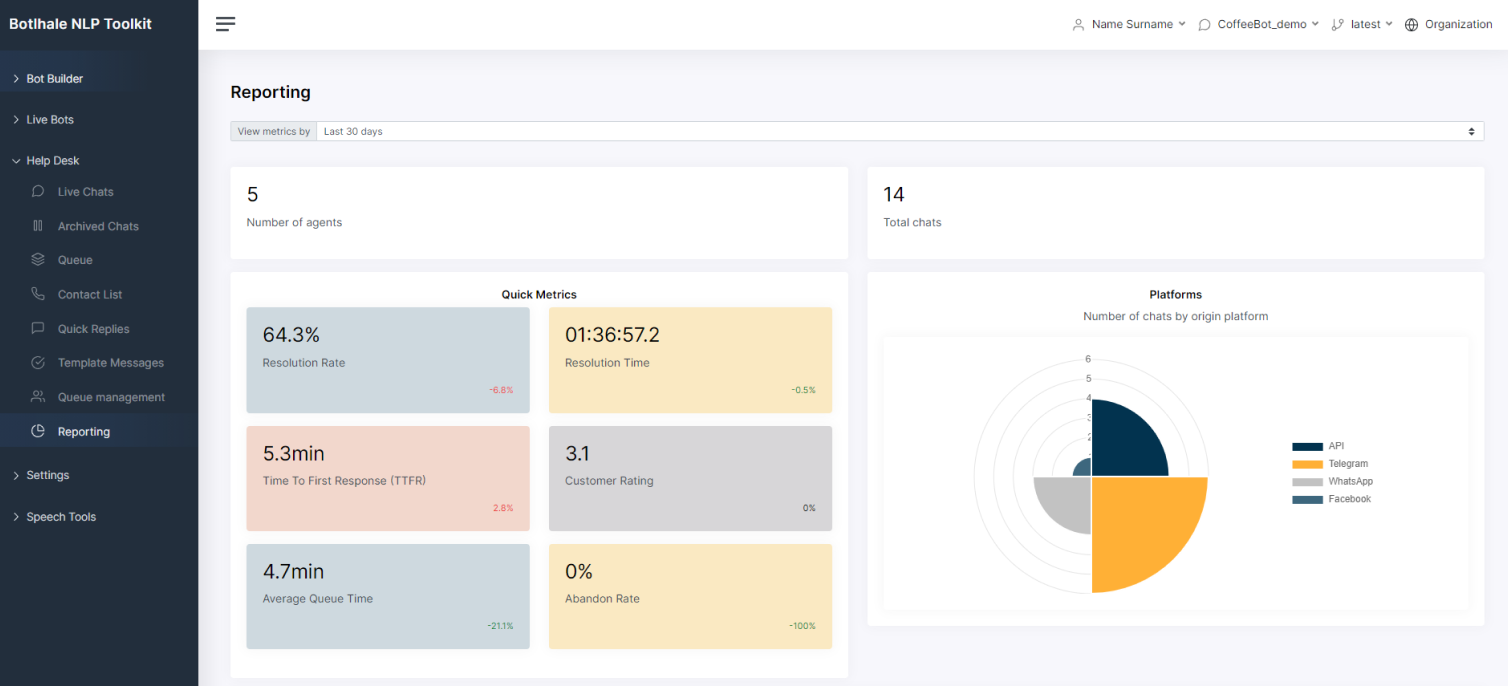
Review Agent Performance
The Reporting dashboard offers a visual representation of data to help track and analyse agent performance metrics. This dashboard shows analytics of the Live Chats handed over by the deployed chatbots to your agents.
The following image gives you a view of the Reporting page.
Contact us
We are here to help! Please contact us with any questions.